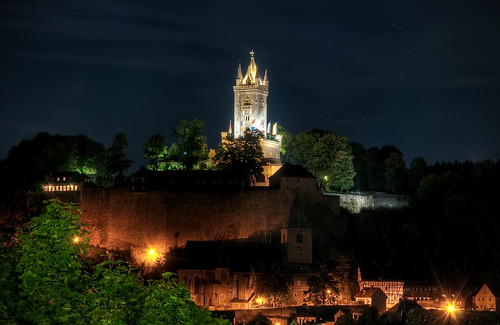
It time for a new shot from my home town Dillenburg. This time at night and in DRI. The procedure is pretty similar to HDR, but generates more natural results.
DRI stands for Dynamic Range Increased. Based on my investigation, there is no real established “definition” for this method, but it is used in similar fashion multiple exposures of a scene to increase the visible color dynamic. I show you here my procedure and my experience with that.
1. I take three exposures +2EV, 0 EV, -2EV
2. I stack them in layers in photoshop in 16bit
(3. I automatic align the photos, if I shot the photos hand held. )
4. I double check the automatic alignment on 100% view and manually adjust it with the v key (happens very often. Don’t know why).
5. make a smart object out of the three layers
6. change the stack mode to mean
The result is a 16 bit photo that looks similar to the 0EV photo, but contains more color shade information. Usually it is also a bit flat. Now you can continue with your normal tone mapping (increase Contrast and shadows and highlights is highly recommended). You can also use plugins like photomatic or topaz adjust.
Advantages of this procedure is.
– The result doesn’t contain so much noise like produced by HDR
– The result looks more normal and realistic than typical HDRs
– It is great for night shots, because it works smooth in shadows and dark skies
– You have the blending of the shots much better under control, because you do it manually
– And you can combine it with best HDR shot get the best out of both worlds
enclosed you see my initial shots. It is fascinating how much more information you can get out of picture.
Hope this inspire your work process
All the best
Werner
P.S.: One related post: http://www.werner-kunz.com/world/2010/02/behind-the-photo-back-bay-from-a-roof-deck/
shot at +2EV

shot at -2EV

Shot at 0EV

Here you find cool a link with more infos about dillenburg. http://brexmother3.blogspot.com/2010/03/wilhelmsturm-in-dillenburg-germany.html
I wanted to thank you for this excellent read!! I definitely enjoyed every little bit of it. I have you bookmarked your site to check out the new stuff you post.
great post as usual!
Very delightful blog, founder a super man! Desing is cool!
Although I am unconcerned with realistic in my own work, I think HDR is usually too realistic in the wrong way. This looks great!
thank you that you like it. Cheers.
Hi,
you do not post in your language which I suppose is German? 🙂 But so far I understood.
I hope to learn more of photography. So far, I had an eye for it and just shot. But now I am finding HDR so great.
I cannot find DRI on my camera. Which camera do you use? I heard it is with Sony – maybe only?
thanks
Hi,
thanks for the comment.
For clarification I need to explain some term usage. All have to do with dynamic range and there is no exact definition for all of this.
1. When the term HDR is used on photography sites, most people mean dedicated software like photomatix, HDRefex or the HDR module of photoshop.
2. HDR in cameras are using a similar software right into the camera (e.g. iphone, all modern DSLRs). The process it totally automatic and the result is more sutle (better shadows & highlights). Not really a photo artistic perspective like 1)
3. What I lable here as DRI (Dynamic range increased) is a more manual process of handling high dynamic range scenes, that doesn’t need any dedicated software like 1). The article is already a bit older and things have changed since then. I learn the term from somewhere, but it did fly off and no one is using it anymore. Today I would lable it “image stacking/image averaging” or a form of “exposure blending”
So, you will not find “DRI” as lable in a modern camera, but very likely “HDR” (see 2).
Hope that helps.