People, who new my stuff, know that I use very much HDR. HDR is pretty popular at the moment and you can find on every photo platform a lot of good (and bad) examples (http://www.hdrspooting.com). The opinion about this technique are very controversial. Some like it and some hate it. I personally like it, because you can get so much out of your pictures in the post processing (if is a nice shot in the first place). I’m not a fan of overdone HDRs and try to be in my work as close as possible to the original look right in the moment the photo was captured.
You can find a very nice tutorial how to make HDRs with photomatix on http://www.stuckincustom.com . This description is very helpful, but after processing around 100 HDR, I want to add some insights from my typical work flow. Although every HDR is slightly different, I discovered myself doing very often very similar things.
1. Shooting three exposures: +2EV, 0 EV, -2EV. I seldom use five exposures, because I can barely detect a difference in quality and my camera (Nikon D90) shouts only three exposures automatically in a row. Another reason for three exposures is, that you need to align the pictures later. The more pictures you align, the more likely one doesn’t fit exactly on the others (especially when the shots are hand hold).
here are my original raw shots:


2. Alignment: I use the “merge to HDR” command by photoshop and generate a 32bit picture. I don’t use any other built-in hdr features of photoshop. I realized that photoshop is much better in alignment than photomatix. You find the merge command under (file, automate, merge to HDR. Then you can choose, if you want to use the three open pictures or load three picture into it.
3. Tonemapping: I use the PS plug-in from photomatix. How to deal with the dialogs you can learn very easily in the tutorial on http://www.stuckincustom.com. Although every picture needs very specific settings to look natural, I realized, that I very often use for my daily landscape pretty similar setting (you see it below).

Strength: You can have it on 100, when you start fine-tuning, but at the end you should decrease it a bit to make you picture more natural (mostly around 70)
Color saturation: Usually I start low and add color as the last thing to it (don’t over do it)
light smoothing: I usually use the +2 (most realistic and not very spectacular)
Lightness: Not too high (around +4)
Micro: a bit Micro smoothing and a lot of contrasting help a to make the picture more crisp. It also eliminates a bit the negative side-effects of lightness
Tone: Try to get an even or bell-shape distribution by means of the white and black point. I do it within photomatix, because PS CS4 doesn’t offer levels for 32bit pictures (Bit annoying, but it works here)
4. Converting to 16 Bit and do further filter adjustments (e.g. Topaz Adjust)
5. Most important. I blend the result once again with my best normal shot of the scene (66% HDR, 33% normal) to gain a more realistic look.
Hope this description of my HDR work flow helps you with your work. Please let me know, what you think and add your own HDR flow in the comments !
—–
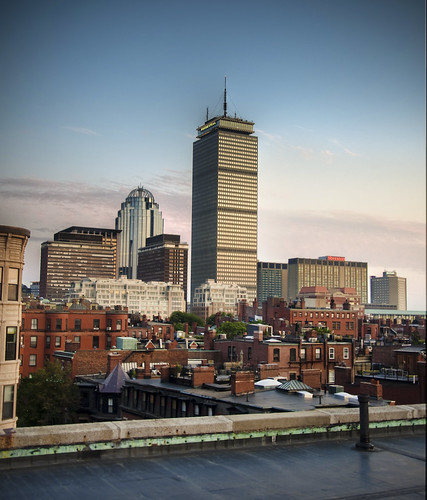
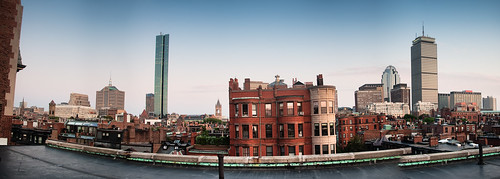
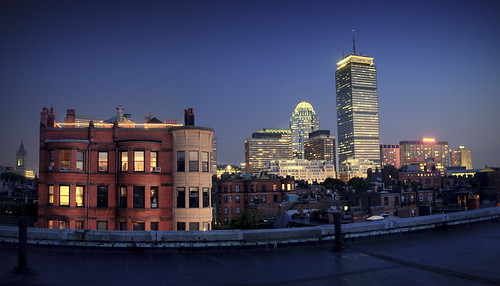
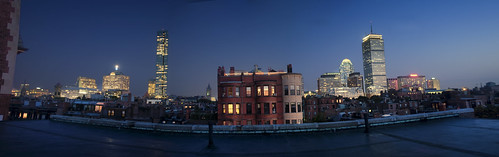
As a bonus some other view of the same scene:
![]()
Hi there,
Not sure that this is true:), but thanks for a post.
BernieR
Thanks for the comment, That is how I usually come to my results. Please interpret the value I deliver here as orientation. Usually I adjust them for every picture more or less. But the direction stays usually the same
I’m happy !It’s pleasant to see someone very extatic about what they do. Keep up the great work and I’ll return for more!Thanks!
Amazing info, i’ve been looking for something like this.
quick question: let’s say you have 3 exposures handheld. So you load all three in PS (on different layers ?) and then you use PS to align them. The end result here is one single picture(file) right, which you then send trough photomatix and so on. I have a feeling i’m missing something here
Hi Alin,
I used photoshop to merge the three photos, but that’s it for the beginning and let do photomatix do the rest.
You are right. my 2. point is a bit fussy. You find the merge command under (file, automate, merge to HDR. Then you can choose, if you want to use the three open pictures or load three picture into it.
Does this help?
Werner
Hi Werner,
Aa, that makes total sense, thank you very much for the information.
i hope you don’t mind me asking a second question: i’ve been admiring your photos for a while now, really amazing stuff. Every time i see one your photos one of the things that surprises me is how sharp they are. What do you use for sharpness?. just simple photoshop or you use some plugin (topaz, nik..etc).
short answer: Nik Sharpening Software. It is easy to use and the results are always onto the point.
longer answer. I sometimes use also some manual sharpening techniques(high pass sharpening etc) and camera raw. I also try to eliminate processing based noise, which on the other hand increase the effect of detail sharpness later.
I’m just in preparation of a blog post about a special sharpening technique I just discovered. Stay tuned
Thank for the nice feedback
Werner