today I want to show you something completely different than my usual photos. Like most of you I like to browse photos on flickr and admire very different photo styles. Beside impressive HDR Landscape, I’m personally very much inspired by well done portrait photos enhanced or created by means of artificial light sources. It is interesting to enhance this raw image later in photoshop and give them a unique style. There are some masters out there, that do incredible work to express the personality of a person or the character of a situation. I would love to learn more in this area and have started therefore to buy one or two strobes and to “copy some style”.
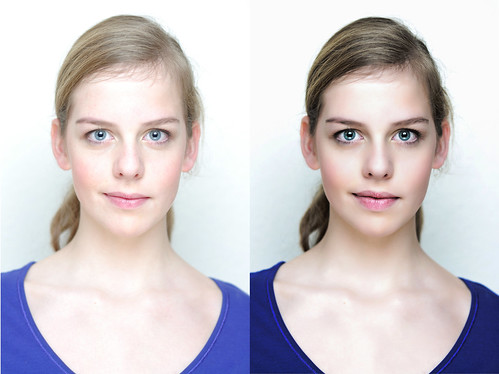
This photo above is one of my first results in this area. I was wondering how this photographer get this typical model style we know from advertising. After some playing around with filters and lighting equipment I got to the result above. I decided to show you both the original studio shot and the photoshop enhanced end result, so you can differentiate between lighting and photoshop. Reminds me a bit on the Dove campaign for real beauty 😉 Hope you like it.
some technical infos for the lighting:
– white Background (I didn’t had a flash left for illuminate this)
– silver reflector umbrella above the camera (you can see it in the eye reflection)
– white reflector underneath the face hand hold by the model (you see a little in the eyes)
Photoshop work
– normal tonemapping
– smoothing the skin with noiseware.
– increase symmetrie in the face (ears, position of eyes, nose, skull in general)
– Increase the lips
– increase contrast in the eyes. Emphaze the highlights there
– clone stamp the wrinkles (you never see any wrinkles in advertising ;-(
All this small changes result in this advertising look.
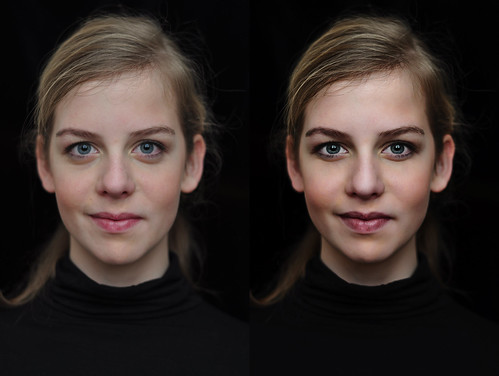
Below you see a second example of a low-key photo.
Hope you like the post. Any recommendations?
All the best
Werner
Wow! I need to learn how to do this. I’ve always wondered how to get my portraits to look so striking.
thank you,
I forgot to mention that most of the “deformation” are made with the liquify filter of photoshop.
I would change every portrait in this style, but young ladies love to get a photo of themselves in this style. Americas next top model looks to have its impact 😉
Hi Werner
I’m, like most of the readers, am very impressed by your work and blog. However, I think dat a lot of people would benefit from a more “in depth” article. A kind of “step by step”. Some descriptions on how its done are simply to vague for me.
Like this portrait approach for example.
But that is just a minor criticism because it is a great blog.
Greetings form Maastricht, The Netherlands
Hie Rob,
thank you for your feedback. That is pretty helpful.
Yes, and you are right I’m sometimes too brief.
One reason why I couldn’t go in detail is, that I didn’t made a documentation, when I post-processed the picture. So remember the things I did, but not the setting nor do I have screenshots of photoshop.
I try to improve that in my next posts.
All the best and hope to cu next time here again.
Werner
Pretty interesting indeed… Kudos mate!
Thank you for the nice feedback. I try to keep up.
Good work mate. The thing i hate is when people go over the top with skin softening and people end up looking like a 5 year old, Skin should still have texture and you seem to have managed that here.
Hi Andy, thank you for the nice comment. Yes, that is really the most important thing for a beauty retouch. I’m still working to get better results. I plan to do a post within the next weeks about low pass retouching. Let see when I will find the time 😉