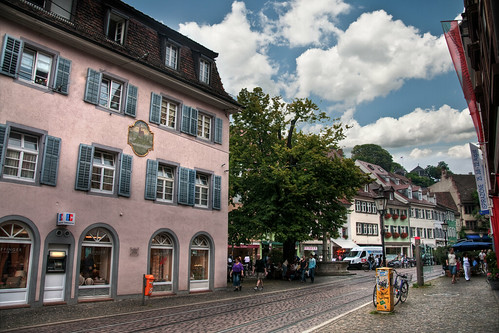
I showed you already in the past some photos of this wonderful town in the South of Germany, Freiburg. Here is now my second part. Beautiful street scenes at a nice and sunny summer day.
But, what doing if you are at a wonderful place but the weather is bad. Coming back again, when the weather is better? Sometimes not an option. In such a case I would replace the sky.
On a photo of a overcast day the colors are not so nice and the sky looks terrible. One advantage of HDR is, that it is possible to get some of the colors back (see here my approach). It would be of course better to do it on a sunny day, but if that is not possible I would highly recommend to do HDR and hope to get more colors back in the post processing.
To replace a sky there are several methods out there (One very easy way to do it is using the new edge refinement tool of Photoshop CS5. But this is not all the time perfect and you can get in trouble and maybe you don’t have CS5). I personally prefer a combined method of blending and masking.
Here is my initial photo to demonstrate my procedure
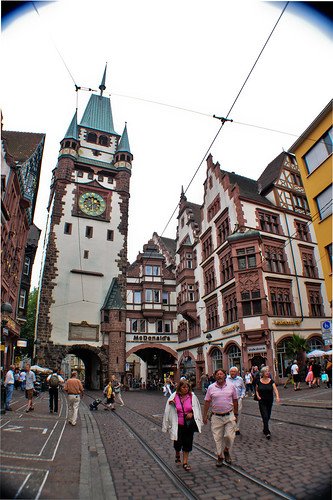
First, I blend my HDR version with my best normal shot (very often 66% HDR / 33% normal). This gives the shot a more realistic looks. You can see that I mask out the HDR shot where moving people are in the picture to eliminate ghosts. To ensure a smoother blending of both shots in this areas. I adjust the ground layer (my normal shot) to the lightness of the HDR shot by means of an adjustment layer.
My photoshop file:

Next, I clone out the wire in the sky (fourth layer from the bottom). The next layer is a general adjustment layer to increase the contrast. The photo till now has a nice street scene but a boring sky. Now start the really sky replacement.
Channel View:
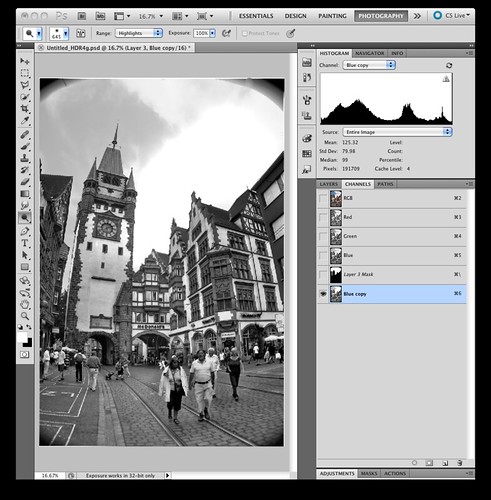
To get a nice mask of the sky, I switch to the channel view and duplicate the blue channel. Because an overcast sky is mainly grey or slightly blue, this channel is almost complete white in the sky and a good staring point for a sky mask. In the next step, I need to make everything that is dark grey turn into black and everything that is very light turn into white. I use for the the dodge and burn tool.
Apply the dodge tool to the highlight and brush over the fringes of the white sky makes every this that is lightly grey completely white. Apply the burn tool to the shadows and brush over the houses and street scene to make everything that is dark grey pitch black. The result is my layer mask 3 and will be my mask for the sky.
Final photoshop file:
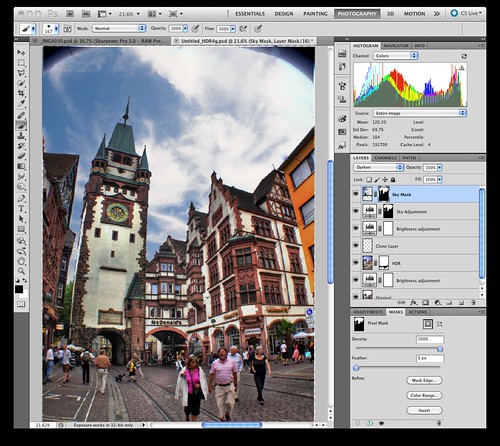
I use this layer mask to my sky layer (top layer in my photoshop document). Here I could stop my tutorial for replacing the sky. But very often this technique still results in some fringing around the houses, although the mask is almost perfect.
For better fringes I use a blending mode technique. An overcast sky is usually lighter than a blue sky, thus if you use the “darken” blend mode for the sky, you get a perfect fit between houses and sky. If this blend mode doesn’t work perfectly, you can improve the result, if you just increase the lightness of the overcast sky (second top layer).
Here is now the final photo.

I hope that blog entry was helpful for you. Please let me know what you think. Enclosed some further shots from Freiburg (with replaced sky).


related posts:
Nice but maybe you should try to use unique sky images as it’s very easy to spot the duplicates. And also you could try bringing the new skies to a mix between your old white/gray overexposed sky and the one your replacing with. At the moment the pictures look a bit too much like photoshop work imho. Keep up the good work!
Hi thank you for your honest critique. Yes, you are right. When I post-processed the pictures, I had only two or three fitting sky pictures and thought it gives a series a consistent looking. A little bit too lazy 😉
If it looks photoshoped. Maybe? In the context of this article maybe many people would say that. But without knowing that!? I get this question also when I have a real cool sky in the background. Sometimes it is too good to be true!?
Two things to add: You should use the same resolution for the sky as for the real picture. And yes, consider that the sky really fits to the scene give the light and tonality.
Hi Werner,
Amazing stuff man. I discovered your website late last year and i’m just amazed by your pictures. I really love your technique.
I’m going trough your posts trying to understand (i’m fairly new to photoshop so you have my apologies if i ask dumb questions) how you are doing things but it seems that i’m the slow guy around here since i keep asking clarification questions :). i do hope i don’t become a nuisance.
I can follow the technique up to duplicating the blue channel.
Let me give you an example so i can better explain my dilemma (i actually executed the following steps in photoshop CS5)
1. I’m starting with a simple image which has a boring sky. It shouldn’t matter that i haven’t started with multiple exposures, convert to HDR, mask in the sky..and so on. Let’s assume that we start from your image labeled: “Here is my initial photo to demonstrate my procedure”
2. my image has one layer (the initial one). I duplicate the layer and then go to channels and duplicate the blue channel.
3. I deselect all the channels and leave just the duplicated blue channel active. my image now looks like your image from “Channel View:” (looks like a B&W image). at this point i assume i’m on the right path
4. i do dodge and burn on the sky and buildings
5. now somehow i should mask in the new sky but i’m not sure how….
maybe i’m missing something here but for me the channel changes are global (for all layers). so when i active back all the channels including the blue copy channel ALL the layers have now a weird red tint.
so the question is: after dodging and burning how to you fix the layer so you can mask the new sky in? I’m kind of assuming that the whole channel copy/ dodge and burn should change the sky on my duplicate layer which i can then mask in the main layer. Or maybe i completely misunderstood the technique.
Hi Alin,
sorry for answering so late, but I was pretty busy.
I completely understand you confusion and I think it is because you need to get the duplicated blue into the mask of duplicated layer. To be honest, I have also sometimes problem with getting this done.
The easiest way is to use the luminosity selection mask
– you are in your channels view and only the blue duplicated channel is selected.
– Make a command click in the blue duplicated channel icon. What you get is a selection of the luminosity of this picture indicated by the marching ants.
– Selected now your layer with the sky and ad a selection mask to it. PS will automatically use the luminosity marked before for the layer mask. Now you should have the sky layer with the exact layer mask.
Does this help?
All the best
Werner
By the way, the picture with the weird red tint is your complete picture with the blue channel as selection mask
Hi Werner,
Thank you very much for the explanation, and your patience :). It makes total sense now.
Personally i’m a huge fan of these technique postings of yours. Please keep them coming.
Regards,
Alin
Thank you for the nice feedback.
I stil have some (I think) interesting stuff. Unfortunately, I don’t have the time now to write a blog post about it.
Maybe in the next month 😉
Cu
Werner